Friday, 27 September 2013

Into the pool we dive!

NB - long time between posts - too busy to do them! - so this (and others) will be backdated to when they actually happened..

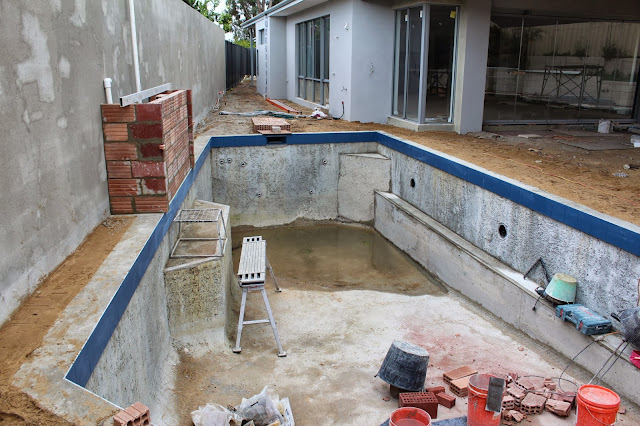
Into the pool we dive!  Well, not quite.

At least the pool company (Pools by Design) is back on the case though.  After having our corner seat and a few other bits of our pool not done very well at the beginning (due to a dodgy supervisor at the time!), we are so grateful to now have a fantastic team assigned to finishing off our pool.

Thanks to the very gorgeous, hardworking and meticulous Gary, we have beautifully straight waterline tiles and bullnose pavers, plus a tiled water feature that sits over a swim-out seat in the middle of the pool. He also added a wide foot ledge all the way along the length of the pool on the alfresco side.  This was something that was missed off at the beginning (yes, missed, can you believe?!).  All sorted now though, thankfully!

Poor Gary had to work during all those wet and windy weather days, doing bits and pieces at a time in between showers.  Because of the rain, it took him a lot longer to finish it all off, but the end result is great!

The pool will now just sit and wait until our aggregate has been poured and the pool fence installed, before the final plastering is done and then the pool is filled straight away.  This will now happen after we move in.

Here's some photos showing the whole process over the past weeks...


 The lovely Gary.  He is SUCH  a nice man!  And very clever at what he does.


Corner seat being adjusted (was installed as the wrong size and shape when the pool was first poured!)

Foot ledge and corner seat in place

 Then the brickwall was rendered.  The final texture coat will be put on later.

Building of the water feature


Tiling finished...

... and rendered!  The bullnose pavers around the edge of the pool are shown here too.

And here's the step tread tiles.


Tuesday, 20 August 2013

Exterior ceilings - work in progress!

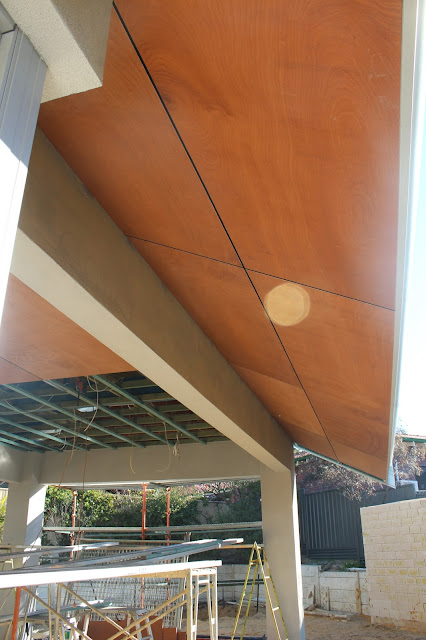
While we're not having any timber on the ground, like decking, we are using quite a lot of timber on the exterior ceilings.  It's being done as large ply sheets that will be stained in a deep brown colour.  The expensive way to do this is to use marine ply, but we are doing it a cheaper way by having basic plywood painted/stained onsite.

The timber is being used all along our front verandah and garage eaves, and out the back for the alfresco and most of the back area ceilings.

The carpenters doing the work on this are absolute perfectionists (which we're loving) and are really taking their time (!!!) with the job.  They've been at it for a few weeks now and are still only about halfway through!

Lots of work has been going on inside while they are working on this job outside.  We are nearly there with the house.  We think??!  We hope!

The photos here show the timber unstained, so the finished colour will look different to this - darker and much more brown than orange.


 Front verandah


 Portico entry


 Alfresco


 Alfresco side eave - looking in


 Alfresco side eave - looking out


Monday, 19 August 2013

Interior painting

The day we went to the house to see the wall painting finished was so scary, because we'd had such trouble trying to confirm our colour.

We wanted a warm grey without any odd undertones like blue, green, pink or purple and it was the HARDEST thing to find - near impossible actually!  The perfect grey seemed to be non-existent.  We went through so many sample pots (no one, not even Murray, will ever know how many!!).  What I thought was the right colour, never looked quite right on the walls.  It was a painful and expensive process!

In the end, we decided to stop looking at Dulux colours and chose a Solver colour instead, because the painter only uses Solver (no doubt because it's cheaper!) and we wanted to avoid any variation in the colour base.

We went with 'Solver Slightly' - at 50% for the majority of walls and 'slightly' darker at 100% for our main bedroom and entertainment room.  The laundry and kids bathroom, plus the doors, ceilings, cornices and skirtings etc are all plain 'Vivid White'.

The end result is exactly what we'd wanted.  It's a 'nothing' colour that is warm and grey - and is not purple, pink or blue!  It probably has a 'slightly' greeny tinge to it, but it's so 'slight' and only shows in some lights, that it's not a problem in the slightest.  Ha ha.

WE LOVE IT!


Also, we are really glad we went with a low sheen paint.  Our builder and painter hadn't wanted us to, and tried so hard to convince us to go with a matt finish - because it apparently looks so much better, hides any imperfections and can be easily touched up if there any marks from final trades and moving in etc.

But we felt it was more important for the paint to be washable - to get kids' grotty handprints and marks off walls.  We felt this outweighed the argument to have a matt finish, so requested that the painter use low sheen.  And it looks good, well at least for the moment.

The photos don't show the colour very accurately, but should give an idea...

And if anyone ever needs any neutral-colour sample pots, you know where to come!  :)


Entry Hallway


Main area showing TV recess


One of the kids' bedrooms


Main bedroom - this and the TV / entertainment room (below), are where the colour is at full strength - though it doesn't look that different in the photos.


 TV / entertainment room

 
 Kids' bathroom - in Vivid White.  Pic also shows their rail shower, now installed.


Friday, 9 August 2013

Frameless Bifolds

Probably the biggest 'feature' for our home - and something we have been really focused on having - is our frameless bifold doors separating the main living area and alfresco. It's something we wanted right from the start and we've had to forgo lots of other things to be able to have them.

We always liked the idea of bifolds, because we want to be able to have the whole opening clear and open, so stacker doors or sliding doors wouldn't have worked as well. The thing we didn't like about bifolds is that they can look a bit busy (with metal frames around each panel).

Then we came across these...


They operate the same way as normal bifold doors, but without the metals sections around each panel.  And you can have some open and some closed, so they are really flexible.

The only downside with having everything open, is flies! We suffered badly with them at Mullaloo (having French doors there with no flywire) and so having a fly screen for our new house was non-negotiable!

There are a few different retractable fly screens on the market, but this one below - the Centor screen - is by far better than anything we saw. You can open and close it without any effort (one finger!) and it can stop at any point along the track. It retracts into each side, so you don't see it unless it's in use.  It was almost the same price as the bifolds, but we reckon it will be worth it!


Soooooo, here are some initial photos of our dream frameless bifolds (note, still with plastic on them). The Centor screen is retracted, so you can't see it here - except for the thin black strip down each side. I couldn't show it in use for these photos, because there's still some work to be done before the doors and screen are completely finished.


Wednesday, 7 August 2013

Toilets, Taps & Island Bench

The kitchen island benchtop was finally fitted after having to be remade from scratch because they'd made it 80mm too small originally. Geez!

Speaking of 80mm, that is the thickness of the bench. We really like the chunkiness of it.

The photos here don't show it very well - because it's been covered in cardboard to protect it from tradies and it was too hard to remove just for one photo. Will get a proper one later!


~
The toilets and most of our internal mixer taps have been fitted now. Seeing them brings back some awful memories of making repeated visits to plumbing shops all those months ago, usually with the kids, trying to compare and match different items. We didn't want to have the same fixtures in all rooms, and in most cases we have mixed and matched different brands to get the style of tap we wanted, with a look that complements each area. Wasn't easy!

There's lots of dirt and unfinished business going on in these photos (including tiling behind toilets and painting etc not yet done), but you'll get the general idea.

 Kids' bathroom basin mixers


Kids' shower and bath mixers (can't show their rail shower yet, we're still waiting on that to be installed)


 Bath swivel spout


Kids' / guest powder room
 
 
Our shower drencher - with a swivel arm


 Our shower mixers


 Our rail shower - we like that it's all square, but the size of the shower head isn't great, so we'll be swapping it over with a bigger one. Having contacts in the plumbing industry has been handy!


Our basin mixers


 Our powder room


Outdoor toilet (cupboard door still missing - apparently it was accidentally scratched so is being re-made!)


Love, love, love this - 'Abey Tink' kitchen mixer.  Our favourite thing of all!  Forgot to take a photo of the groovy pull-out thingo on it.  Will show in a later post.


Double laundry sink - love this too - it's a fireclay ceramic one.  Swivel spout on wall not installed yet.